Akuiteo provides many APIs for managing the different aspects of your company: workforce, CRM, sales, purchase, accounting and more. Our APIs enable you to use the many features of the Akuiteo softwares outside of the application or service. Therefore, you must understand how Akuiteo works to be able to use our APIs.
|
Note
|
All our APIs are in the version 3.0. This version is the only one available and is accessed by default. |
1. What is a REST API ?
API stands for Application Programming Interface. It is a set of rules that enables programs to talk to each other, in order to manage data and access features across the Internet in a consistent format. An API is a technology that links two systems together.
REST stands for Representational State Transfer. REST APIs are a type of web APIs that are based on requests and responses:
You make a request to a resource on a server.
-
The server responds with the requested information.
-
The request consists of an HTTP verb which translates an action (create, modify, search…), a specific URL to access the resource and a set of parameters.
Responses use the generic JSON content type.
2. What is a resource?
Each request is made with specific parameters and the API is accessed at a predefined set of URLs. These URLs represent various resources, that is to say any information or content accessed at that location.
In the context of Akuiteo, a resource represents a management object or an item: an employee, a sales invoice, a project, a project task, and so on.
Following the Domain-Driven-Development approach, our APIs are categorized by domains that represent the different modules in Akuiteo.
The following table lists all our API domains:
Accounting |
The Accounting domain enables you to manage chart of accounts and fiscal years. |
Administration |
The Administration domain contains APIs used for server administration, comparable to the features available in the Administration Console. |
Approval process |
The Approval process domain enables you to manage the different types of approvals available: quotes and quotations, sales and purchase orders, purchase invoices, expense reports, and others. |
Customer Relationship |
The Customer Relationship domain enables you to manage events, opportunities, customers and prospects. |
Document Management |
The Document Management domain enables you to manage documents, publishing templates and document links. |
Legacy |
The Legacy domain regroups all our legacy APIs, which are SOAP web services. |
Messaging |
The Messaging domain enables you to manage subscriptions and webhooks. |
Mobile |
The Mobile domain gives you access to specific APIs for the Akuiteo Mobile Application that works off line. These are synchronization APIs that enable you to retrieve details about expense reports, leave requests, timesheets and so on, and also to send back the data to be saved. |
Project management |
The Project management domain enables you to manage projects, phases, sub-phases and project tasks. |
Purchase |
The Purchase domain enables you to manage quotes, orders, invoices, receptions and suppliers. |
Sales |
The Sales domain enables you to manage quotations, orders, invoices, billing tables and time-based billing. |
Security |
The Security domain enables you to manage everything regarding security, users and rights (DMFs). |
Service integration |
The Service integration domain enables you to send emails and messages. |
Settings |
The Settings domain gives you access to many setup options: triggers, translations, web portals, preferences, currencies and so on. |
Support |
The Support domain enables you to manage helpdesk issues and tasks, contacts, contracts, tags, products, sprints, timesheets and provides many search APIs. |
Workforce |
The Workforce domain enables you to manage employees, timesheets and schedules, expense reports, leave requests, custom requests and project events. |
3. Technical users and user rights (DMF)
|
Note
|
We recommend that you use technical users to make calls to our APIs. |
A user must be created and set up from the Application Desktop to be able to connect to and use the different applications: the Application Desktop, the web portals, the mobile application. Technical users can also be created from the Desktop specifically to access APIs. A technical user will not be able to use its login and password to access the Akuiteo applications.
Whether it is a standard or a technical user, setting up the user from the Desktop will enable you to authenticate yourself, that is to say to prove your correct identity. The authenticated user will appear in the history of a management object for creation and modification actions. For more information, refer to Authentication.
However, you must also manage user rights in order to manage authorizations, that is to say the actions allowed for that user. An API might authenticate you but not authorize you to make a certain request.
User rights are assigned to each user. In Akuiteo, these rights are called DMFs (for Domain-Module-Function) and enable users to access specific modules or functions of our applications. There are two types of DMFs:
-
Functional DMFs that apply to modules and features in the applications.
-
API DMFs that grant permissions to call APIs. These DMFs can only be assigned to technical users.
4. Authentication
Three types of authentication are available for our APIs:
|
Warning
|
If SAML is active on your environment, a non SAML authenticated, technical user must be used. SAML authenticated users will receive 401 error reponses to any API request. |
4.1. Basic authentication
For the basic authentication, you send your username and password alongside every API call. This login/password must be the login information of an Akuiteo user (technical or standard).
An Authorization header must be added alongside any request:
|
💡
|
Using curl
The string The string |
|
Note
|
When using the basic authentication, you must use /rest as the security selector in the Resource path URL. |
4.2. OAuth authentication
For the OAuth authentication, you must first request an access token in order to authenticate yourself. Then you can start to perform API calls, but only for a limited period of time before it needs to refresh that token. With this type of authentication, you do not have to share login information on each API calls.
To be able to use the OAuth authentication:
-
From Akuiteo’s Administration Console, go to Security > Oauth2 and create a New client with the following information:
| Field | Description |
|---|---|
Client ID |
Client ID used for the Oauth authentication. |
Duration (s) |
The duration indicates the number of seconds that the access token will be valid. |
Reload duration (s) |
A refresh token makes it possible to request a new access token without having to enter the login information again. The reload duration indicates the number of seconds that the refresh token can be used to request a new access token. |
Scope |
Fill in read_write. Since authorizations are based on DMFs, you can give access to the read_write scope to read, modify and delete resources. |
⇒ Once created, Akuiteo provides you with a Client Secret.
-
To retrieve the access token, make an API call using the request: POST /oauth/token with
application/x-www-form-urlencodedasContent-Type.
curl --location --request POST 'https://akuiteo.mon-server.fr/akuiteo/oauth/token' \
    --header 'Content-Type: application/x-www-form-urlencoded' \
    --data-urlencode 'grant_type=password' \
    --data-urlencode 'client_id={your_client_id}' \
    --data-urlencode 'client_secret={your_secret}' \
    --data-urlencode 'scope=read_write' \
    --data-urlencode 'username={your_username}' \
--data-urlencode 'password={your_password}'|
Note
|
When needed, use the refresh token to get a new access token. |
Once you get the access token, an Authorization header must be added alongside any request:
|
💡
|
Using curl
The string The string |
|
Note
|
When using the OAuth authentication, you must use /RS as the security selector in the Resource path URL. |
4.3. JWT authentication
JWT authentication requires first obtaining a JWT token. Once authenticated, you can use this token to perform subsequent API calls without sending your login credentials on each request.
4.3.1. Get the JWT Token
To retrieve the token, make a GET request to /jwt/login.html, providing your credentials in the URL parameters:
-
username= your login, URL-encoded -
password= your password, Base64-encoded, then URL-encoded
Both parameters must be properly URL-encoded to ensure the request works reliably.
curl --location --request GET \
'https://akuiteo.mon-server.fr/akuiteo/jwt/login.html?username={url_encoded_username}&password={url_encoded_base64_password}'If your credentials are:
-
Username:
sebastien.maillard@akuiteo.com -
Password:
HWVYSS4DJKIHRWGT
Then:
-
URL-encoded username:
sebastien.maillard%40akuiteo.com -
Base64-encoded password:
SFdWWVNTNERKSktIUldHVA== -
URL-encoded Base64 password:
SFdWWVNTNERKSktIUldHVA%3D%3D
curl --location \
  'https://akuiteo-50.akuiteo.fr/akuiteo/jwt/login.html?username=sebastien.maillard%40akuiteo.com&password=SFdWWVNTNERKSktIUldHVA%3D%3D'
4.3.2. Use the JWT Token in Subsequent API Calls
Once you receive the JWT token, include it in the Authorization header of each API request:
--header 'Authorization: Bearer {jwt_token}'|
Note
|
This authentication method avoids sending credentials repeatedly.
When using JWT, all API requests must be made under the |
5. Data formats
Our APIs follow to the same principles as typical REST services. Each operation is performed via an HTTPS request to a specific URL, which may include parameters or a request body.
When a request body is required, it must be in JSON format, which is also the format used for all API responses. The Content-Type header should be set to "application/json".
The parameters and/or request body required will depend on the specific API endpoint you are calling. It is important to consult the API documentation to understand what is needed for each API.
|
Note
|
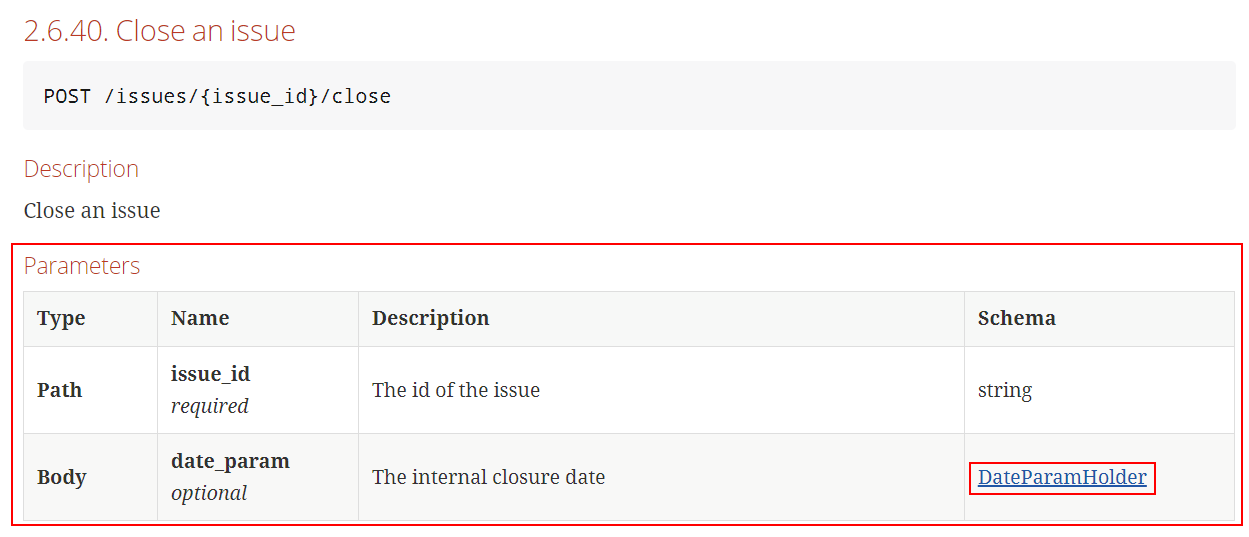
If there is a link in the Schema column for a parameter or a body, click on the link to know more about the type of data required. |
When making a request, the data provided as parameters or in the request body should comply with standard REST conventions:
-
Objects are enclosed in curly braces { }.
-
Object properties are named in camelCase.
-
Collections are enclosed in square brackets [ ].
The data types in the schema can include:
5.1. Date Format
Our APIs use standardized date and time formats to ensure consistent handling of time zones and seasonal changes, such as daylight saving time. Below are the different formats used in the APIs.
5.1.1. Date-Time Format (date-time):
The date-time format follows the RFC 3339 standard (yyyy-MM-dd’T’HH:mm:ss.SSSXXX) and uses Coordinated Universal Time (UTC).
-
2024-08-08T00:00:00Zmeans midnight on August 8, 2024, UTC.
This format also includes a time offset (+hh:mm) to represent the difference between local time and UTC.
Examples:
-
2024-08-08T00:00:00.000+0000represents midnight on August 8, 2024, in UTC, with no offset. -
2024-08-08T00:00:00.000+0200represents the same moment (midnight UTC), but converted to Central European Summer Time (UTC+2).
5.1.2. Date Only Format (date):
This format is used when only the date without time is needed. It is represented as yyyy-MM-dd (RFC 3339) and does not include any time offset, as no time is involved.
Examples:
-
2024-08-08: August 8, 2024. -
2023-12-25: December 25, 2023.
In this case, the API simply returns the date without any UTC conversion, as time is not relevant.
5.1.3. Year-Month Format (date-month):
This format includes only the year and month, without day or time. It is expressed as yyyy-MM (RFC 3339).
Examples:
-
2024-08: August 2024. -
2023-12: December 2023.
Use of date format in API requests
When consulting the API documentation, the Format column indicates whether you should use a date-time format (including date and time) or a date format (date only). This helps you determine the required format for each API field.
1. Sending a request : How to set the time zone and daylight saving time?
If you want to display a specific date and time in your software according to your local time zone, you can either use the UTC time directly in the API or manually adjust the time based on your time zone offset.
Here are two possible methods for formatting the date and sending it to the API:
Method 1: Use UTC time directly
You can retrieve and send the exact UTC time for the date without adding any offset, as the API defaults to UTC. This time will then be automatically converted according to the user’s time zone.
-
If you send to the API:
2024-08-08T00:00:00.000+0000which represents August 8, 2024, at 00:00 UTC, your software will then display this time based on the user’s time zone.-
In France during summer (UTC+2), this will automatically be interpreted as 2:00 AM on August 8, 2024.
-
In France during winter (UTC+1), this will automatically be interpreted as 1:00 AM on August 8, 2024.
-
-
If you send to the API:
2024-08-07T22:00:00.000+0000which represents August 7, 2024, at 22:00 UTC, your software will then display this time based on the user’s time zone.-
In France during summer (UTC+2), this will be automatically interpreted as midnight (00:00) on August 8, 2024.
-
In France during winter (UTC+1), this will be interpreted as 11:00 PM on August 7, 2024.
-
Method 2: Adjust based on the local time zone
If you want the time to be midnight local time in France, you need to account for the offset with UTC.
-
In summer (UTC+2): To display midnight on August 8, 2024, in France, you have two options for sending the time to the API:
-
Subtract 2 hours: Send the following value to the API:
2024-08-07T22:00:00.000+0000. This corresponds to August 7, at 22:00 UTC, which will automatically be converted to midnight (00:00) on August 8, in France. -
With UTC+2 offset: You can also send the following value directly to the API, with a +02:00 offset for daylight saving time in France:
2024-08-08T00:00:00.000+0200.
-
-
In winter (UTC+1): To display midnight on December 8, 2024, in France, you have two options for sending the time to the API:
-
Subtract 1 hour: Send the following value to the API:
2024-12-07T23:00:00.000+0000. This corresponds to December 7, at 23:00 UTC, which will automatically be converted to midnight (00:00) on December 8, in France. -
With UTC+1 offset: You can also send the following value directly to the API, with a +01:00 offset for winter time in France:
2024-12-08T00:00:00.000+0100.
-
2. Receiving API Responses
When you make a API request, if the field format is date-time, the response will always be in date-time format expressed in UTC, regardless of the time zone of the user making the request.
Examples:
-
In summer: If you request a resource that was created on August 8, 2024, at 2:00 PM local time in France (summer, UTC+2), the API will return:
2024-08-08T12:00:00.000+0000. This response corresponds to 12:00 PM UTC, as the API always returns the date and time in UTC. -
In winter: If you request a resource that was created on December 8, 2024, at 2:00 PM local time in France (winter, UTC+1), the API will return
2024-12-08T13:00:00.000+0000. This response corresponds to 1:00 PM UTC, as the API always returns the date and time in UTC.
5.2. Number Format
Numbers are used to represent numeric values. Here are the different types of numbers supported by the API:
-
Number: Represents any numerical value. It is important not to use separators for thousands, millions, etc. Example:
1000, not1,000or1.000. -
Number (double): Represents floating-point numbers with high precision. The period (ASCII
0x2E)must be used as the separator for decimal values. Example:10.8, not10,8. -
Number (float): Also represents floating-point numbers but with less precision than the double type. The period (ASCII
0x2E) is also used as the separator for decimal values. Example:10.8.
5.3. Integer Format
Integers are numbers without decimal points.
-
Integer (int64): Represents signed 64-bit integers (long type). Example:
10. -
Integer (int32): Represents signed 32-bit integers (standard type).
5.4. Boolean Format
-
Boolean: Represents two possible values: true and false. Only these two values are allowed in our APIs.
-
Values such as 0, 1, null, "true", or "" (empty string) are not considered boolean values.
-
6. Request
The Akuiteo APIs follow the same principles as any REST APIs. Each operation is done via an HTTPS call to a specific URL, potentially accompanied with some parameters or with a request body.
Request bodies and responses use the generic JSON content type.
|
Note
|
API calls are made on resources from the default company of the user making the request. If you want to change the company targeted with your API calls, add the following line to the header alongside any request:
|
6.1. HTTP verbs
The HTTP verbs are at the core of the APIs. To make a request, you need an HTTP verb which represents an action (create, modify, search…) made on one or multiple resources.
The method used depends on the API you want to call. You must read the API documentation to identify the resource path required for each API:
The following standard methods are used in our APIs:
GET |
Retrieves the targeted resource or all the items in a collection. The response does not display any sub-objects, it only displays ids. Use this method to show the details of the targeted resource.
|
||||
POST |
Updates the targeted resource or all the items in a collection. This method is also used for functional operations and for Akuiteo-specific APIs.
|
||||
PUT |
Creates a resource.
|
||||
DELETE |
Deletes the targeted resource or all the items in a collection.
|
||||
PATCH |
Updates specific parameters in the targeted resource and not the whole resource. This method follows the RFC 6902.
|
Actions that do not correspond to standard HTTP methods and are specific to Akuiteo are collected under a sub-resource. For more information, refer to Akuiteo’s API specifics.
6.2. Resource path URL
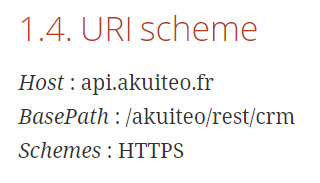
The path URL to access the resource and make a request using our APIs follows the structure:
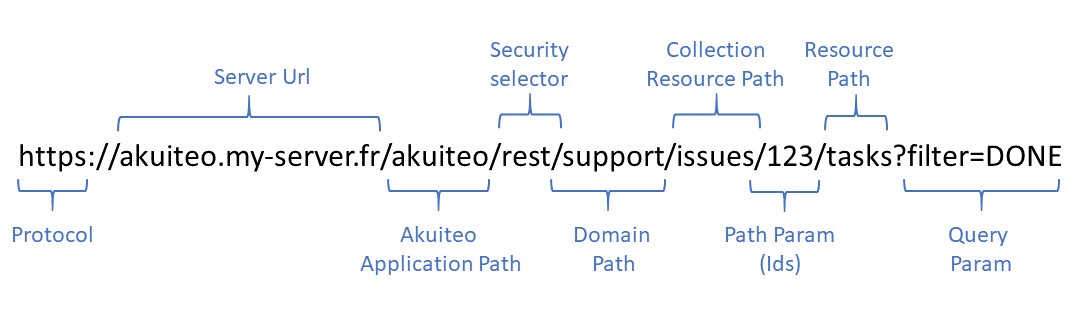
Let us dissect this URL:
Protocol |
Always use the HTTPS protocol when making requests to our APIs. |
||
Server URL |
Address of your Akuiteo server, for example akuiteo.com or CustomerA-akuiteo.com. |
||
Akuiteo Application Path |
Name of your Akuiteo application, for example akuiteo or akuiteo-test. |
||
Security selector |
If you are using the basic or JWT authentication, use /rest as the security selector. If you are using the OAuth authentication, use /RS as the security selector. |
||
Domain Path |
Name of the domain targeted by the request. Our APIs are categorized by domains that represent the different modules in Akuiteo. Refer to the API documentation to know more about each domain.
|
||
Resource path |
The resource path depends on the API you want to call. You must read the API documentation to identify the resource path required for each API: 
Depending on the API, there can be a number of elements in the resource path:
|
6.3. Response status codes
Akuiteo uses conventional HTTP response codes to indicate the success or failure of an API request.
-
If the status code starts with 2xx, it means the request has succeeded.
-
If the status code starts with 4xx, it means the request has failed because of a client error (data format, unknown resource, etc.).
-
If the status code starts with 5xx, it means the request has failed because of a server problem.
The following response status codes are used for our APIs:
Code |
Type |
Description |
200 |
OK |
Standard success code. The request has succeeded. |
201 |
Created |
The resource has been created (usually for PUT or POST requests). |
204 |
No Content |
The request has succeeded but there is no content to retrieve. |
400 |
Bad Request |
Standard failure code. The server cannot or will not process the request due to an unexpected error. |
401 |
Unauthorized |
The user does not have valid authentication credentials for the target resource. |
403 |
Forbidden |
The user does not have permissions to perform the request. |
404 |
Not Found |
The requested resource does not exist. |
405 |
Method Not Allowed |
The HTTP method requested on the resource is not supported, for example if you make a POST request on a resource where POST does not make sense or is not implemented. |
406 |
Not Accepted |
The requested resource is capable of generating only content not acceptable according to the Accept headers sent in the request. |
500 |
Internal Error |
Server errors. The call was successful but something went wrong on Akuiteo’s end. |
6.4. Akuiteo’s API specifics
API_SpecificAPIs
Some features available in the Akuiteo applications could not be translated in REST APIs using the standard HTTP methods.
For example, you might have to make an action on a resource that will change its state without changing the resource in itself. In the context of a helpdesk issue, when you assign a task to yourself, you change the state of the task without changing the task in itself.
This is why Akuiteo provides specific APIs whenever the standard methods do not apply. These APIs:
-
use the POST HTTP verb,
-
can be identified because they mostly use a verb (search, read, bill, take, and so on) as a sub-resource in their resource path.
Described below are the main Akuiteo-specific APIs that you will encounter.
6.4.1. /search APIs
The /search APIs allow you to retrieve resources from a collection by specifying a set of searchcriteria in the request body. These APIs are designed to provide precise and flexible filtering options to target specific resources, such as employees, projects, or tasks.
Each search criterion is applied in combination with theothers, and the conditions are logically connected using an “AND” relationship. This means that only resources matching all specified criteria will be includedin the results.
For each field, you can define one and only one search criterion. It is not possible to specify multiple criteria for the same field simultaneously, such as searching for a status that is both "active" and in a list of values like ["active", "closed"].
However, if you need to define multiple conditions for the same field, you can use the CLAUSES operator. This operator allows you to combine subconditions for a single field using logical operators like AND or OR. For example, you could search for resources where the status is either "active" or belongs to a specific list of values.
By supporting these combinations and constraints, the /search APIs ensure both flexibility and clarity in how search queries are constructed.
The following sections provide detailed explanations of the supported operators, examples of common use cases,and guidance on how to create complex search queries when needed.
|
💡
|
By default operations on dates only apply to the date component. It is possible to take the time component into account by adding the attribute "withTime": true.
|
The different search operations available are:
LIKE |
Search for resources with a parameter value that matches the searched value. You want the list of custom requests with an ID that starts with 12. The request body will be:
Supported wildcards can be set via the wildcards attribute ("*%_" by default). In the next example, the only supported joker is the asterisk, the percent character is searched as is, and will not be interpreted as a wildcard : |
||||
NOT_LIKE |
Search for resources with a parameter value that doesn’t match the searched value. You want the list of custom requests with an ID that doesn’t start with 12. The request body will be:
Supported wildcards can be set via the wildcards attribute ("*%_" by default). In the next example, the only supported joker is the asterisk, the percent character is searched as is, and will not be interpreted as a wildcard : |
||||
IS |
Search for resources with a parameter value that is the same as the searched value. You want the list of the custom requests from the employee with an ID AAA. The request body will be: |
||||
IS_NOT |
Search for resources with a parameter value that is not the same as the searched value. You want the list of all custom requests except the ones with the project ID 12345. The request body will be: |
||||
IS_NULL |
Search for resources with a parameter value that is null. You want the list of custom requests that are not linked to a project (projectId null). The request body will be: |
||||
IS_NOT_NULL |
Search for resources with a parameter value that is null. You want the list of custom requests that are not linked to a project (projectId null). The request body will be: |
||||
IN |
Search for resources with a parameter value that matches one of the values specified in the searched value. You want the list of custom requests from the employees with the ID AAA, BBB and CCC. The request body will be: |
||||
NOT_IN |
Search for resources with a parameter value that matches none of the values specified in the searched value. You want the list of custom requests from the employees without the ID AAA, BBB or CCC. The request body will be: |
||||
GREATER_OR_EQUALS |
Search for resources with a parameter value that is greater than or equal to the value specified in the searched value. You want the list of custom requests with an ID that is greater than or equal to 12345. The request body will be: |
||||
GREATER |
Search for resources with a parameter value that is strictly greater than the value specified in the searched value. You want the list of custom requests with an ID that is greater than 12345. The request body will be: |
||||
LOWER_OR_EQUALS |
Search for resources with a parameter value that is lower than or equal to the value specified in the searched value. You want the list of custom requests with an ID that is lower than or equal to 12345. The request body will be: |
||||
LOWER |
Search for resources with a parameter value that is strictly lower than or equal to the value specified in the searched value. You want the list of custom requests with an ID that is lower than 12345. The request body will be: |
||||
CLAUSES |
Search for resources with a combination of clauses on the same property. The most common example is searching for elements between two values. For example, suppose you want the list of custom requests with a date between January 1st, 2020, and December 31st, 2020. The request body would be:
Suppose you want the list of custom requests with a date that is not between August 1st, 2020, and August 31st, 2020. The request body would be: You can nest clauses. For example, if you want all amounts between 100 and 200 or between 400 and 500:
|
6.4.2. /read APIs
Our /read APIs can be used to retrieve all the details of a resource. In one API call, you can get all the information about the targeted resource, including dependencies. Our /read APIs enable you to retrieve the information that is not displayed when using the standard GET method.
ReadOptions are used in the request body to specify the dependencies that you want to display in the API’s response. The ReadOptions available depend on each resource. You must read the API documentation to know more about the ReadOptions available.
Example of a standard GET API
The API GET /invoices/{purchase_invoice_id} lets you retrieve basic information on a specific purchase invoice.
Response
{
    "modeReglement": "PR",
    "conditionReglement": "00030",
    "buyerCode": null,
    "id": "FF2100462",
    "project": null,
    "projectId": "FG",
    "phase": null,
    "phaseId": "500005899",
    "subPhase": null,
    "subPhaseId": "500005450",
    "type": "PURCHASE_INVOICE",
    "number": "FF2100462",
    "date": "2021-03-25T00:00:00.000+0100",
    "name": "Facture electricité DEC 2020",
    "companyCode": "AKSAS",
    "afterTaxAmount": 1794.08,
    "preTaxAmount": 1501.46,
    "projectedApprovalDate": null,
    "currencyCode": "EUR",
    "currency": null,
    "thirdPartyId": "500001720",
    "thirdPartyToBillId": null,
    "description": null,
    "entityCode": "G&A",
    "manager": null,
    "managerId": null,
    "changeTracking": {
        "createdTime": "2021-03-25T23:21:15.433+0100",
        "createdBy": null,
        "createdById": "-1",
        "modificationTime": "2021-03-25T23:32:17.743+0100",
        "modificationBy": null,
        "modificationById": "-1"
    },
    "text": null,
    "comment": null,
    "payment": null,
    "accountingJournalId": null,
    "reference1": "108002809284",
    "reference2": null,
    "reference3": null,
    "supplier": null,
    "lines": [],
    "supplierDate": "2021-03-25T00:00:00.000+0100",
    "dueDate": null,
    "invoiceType": "INVOICE"
}
⇒ In this example, the lines of the purchase invoice are not displayed.
Example with the /read API
Now, let’s try the API POST /invoices/{purchase_invoice_id}/read to retrieve more information about the invoice’s lines.
Request body
{
    "options" : ["LINE", "LINE_PROJECT", "LINE_ITEM"]
}
Response
{
    "modeReglement": "PR",
    "conditionReglement": "00030",
    .....
    "supplier": null,
    "lines": [
        {
            "id": "500053139",
            "project": {
                "id": "FG",
                "name": "AKUITEO : FRAIS GENERAUX",
                "companyCode": "AKSAS",
                "customerId": "144",
                "endCustomerId": "144",
                "internal": true,
                "leave": false,
                "leaveType": null
            },
            "projectId": "FG",
            "phase": null,
            "phaseId": "500005899",
            "subPhase": null,
            "subPhaseId": "500005450",
            "businessDocumentId": "FF2100462",
            "name": "TOTAL : Conso Electricité",
            "complementName": null,
            "quantity": 1.0,
            "unitPriceCurrency": 1071.05,
            "unitPrice": 1071.05,
            "amountTotalCurrency": 1071.05,
            "amountTotal": 1071.05,
            "rankNumber": 100.0,
            "generalAccount": null,
            "vat1": {
                "code": "01",
                "rate": 20.0
            },
            "vat2": null,
            .....
        },
        {
            "id": "500053140",
            "project": {
                "id": "FG",
                "name": "AKUITEO : FRAIS GENERAUX",
                "companyCode": "AKSAS",
                "customerId": "144",
                "endCustomerId": "144",
                "internal": true,
                "leave": false,
                "leaveType": null
            },
            "projectId": "FG",
            .....
        },
        {
            "id": "500053137",
            "project": {
                "id": "FG",
                "name": "AKUITEO : FRAIS GENERAUX",
                "companyCode": "AKSAS",
                "customerId": "144",
                "endCustomerId": "144",
                "internal": true,
                "leave": false,
                "leaveType": null
            },
            "projectId": "FG",
            .....
        }
    ],
    "supplierDate": "2021-03-25T00:00:00.000+0100",
    "dueDate": null,
    "invoiceType": "INVOICE"
}
7. Webhooks
7.1. Introduction
Akuiteo’s webhook system enables you to receive notifications in real-time whenever specified events occur within the platform. This allows seamless integration with external services like HR management tools, financial systems, or custom applications by triggering HTTP requests when certain actions take place in Akuiteo.
7.2. How It Works
When an event occurs, the webhook sends an HTTP POST request to a specified external endpoint, containing information about the event, including the object involved and the action performed.
Event Types: The eventType field in the payload indicates the type of entity involved, such as CUSTOMER, EMPLOYEE, PROJECT, or other types. You can find a complete list of event types in the EventType.
Event Actions: The eventAction field describes what has happened to the entity—either INSERT, UPDATE, or DELETE, or other specific actions such as SMARTSCAN_DONE.
7.3. Payload Structure
The payload of the webhook is a JSON object structured to provide essential information about the event. Here is a typical example:
{
  "emittedAt": "2024-09-23T10:45:00+02:00",
  "eventType": "PROJECT",
  "eventAction": "UPDATE",
  "requestId": "12345-67890-abcdef",
  "content": {
    "id": "987654321"
  }
}-
emittedAt: The timestamp of when the event occurred.
-
eventType: The type of entity the event pertains to (e.g.,
PROJECT,EMPLOYEE). -
eventAction: The action that triggered the webhook (e.g.,
INSERT,UPDATE,DELETE). -
requestId: A unique identifier for this webhook request, useful for tracking and logging.
-
content: Contains data relevant to the entity, typically including the unique
idof the object that experienced the event. Depending on the event, more detailed information can be added to thecontentfield.
7.4. Security
Webhooks in Akuiteo use a secure mechanism to ensure the authenticity of requests. Each payload is signed using an HMAC signature, which is calculated using a secret that you configure when setting up the webhook. The signature is included in the X-Hub-Signature header, allowing you to validate the webhook request by comparing the received signature with one generated on your server using the same secret.
Steps to verify webhook requests:
-
Retrieve the payload and the
X-Hub-Signatureheader. -
Calculate the HMAC of the payload using your configured secret and the SHA256 algorithm.
-
Compare your calculated HMAC with the received signature. If they match, the request is authentic and has not been altered.
|
Important
|
The payload used to calculate the HMAC must be taken directly from the raw content of the request body, without any formatting. Here’s an example: Ensure that your secret is securely stored and used for validation as outlined in the above steps. |
You can refer to code samples in different languages (such as Java, PHP) to implement this validation here.
7.5. HTTP Status Codes & Retry Mechanism
Akuiteo expects the external system to respond with an HTTP status code between 200 and 299 to indicate successful receipt of the webhook. Any response outside this range will be interpreted as a failure, and the webhook system will automatically retry sending the request based on the following logic:
-
Retry Limit: You can configure the maximum number of retries (between 1 and 8 attempts).
-
Retry Intervals:
-
By default, retries are performed with an exponentially increasing delay, calculated as:
timeout + retry_number^4. This means that each subsequent attempt is spaced further apart to avoid overloading the system. -
Alternatively, for testing purposes, you can configure the retry system to use a fixed 3-second interval between attempts, which is helpful in non-production environments.
-
-
Timeout: The timeout value is configurable, determining how long the webhook system will wait for a response from the external server before considering the request failed. The recommended timeout is several milliseconds to avoid premature failure during high latency scenarios.
-
Failure Handling: If all retry attempts fail (i.e., no 2xx HTTP status is received), the webhook will stop trying to send the request, and an error log will be generated for review. You can download the logs and inspect them to identify the root cause of the failure.
Here is an example of the retry configuration in Akuiteo’s webhook setup:
-
Timeout (in ms): 5000 (wait 5 seconds for a response).
-
Max retries: 5 attempts.
-
Exponential retry: Enabled for production, ensuring the interval increases after each attempt.
7.6. Setting Up a Webhook
-
In the Admin Console, navigate to Configuration > Webhooks.
-
Click Create a New Webhook and provide the following details:
-
Name: A label for the webhook.
-
Endpoint URL: The URL where the webhook will send POST requests.
-
Event Type: The entity for which events will be triggered (e.g.,
PROJECT,EMPLOYEE). -
Event Action: The action that will trigger the webhook (e.g.,
INSERT,UPDATE,DELETE). -
Secret: (Optional) Set a secret key for secure HMAC signature validation.
-
-
Configure retry options and timeouts.
-
Test the webhook to verify connectivity.
-
Once validated, click Create.
-
7.7. Best Practices
-
Secure Your Endpoint: Always use HTTPS to ensure secure data transmission.
-
Handle Retries Gracefully: Make sure your system is prepared for retries, avoiding duplicate processing.
-
Use Logging: Enable detailed logs for troubleshooting in case of webhook failures.
8. Follow our tutorial to get started!
In this tutorial, we will use the following information:
-
Basic authentication
This tutorial will be using APIs from the Workforce domain. You must refer to the API documentation of this domain to know the URL paths, the parameters and other details about each API.
8.1. Searching for employees
Let’s start by searching for the employees with an employee code that starts with the letter J. We will use the API: POST /employees/search
Request (cURL)
curl --location --request POST 'https://akuiteo.my-server.fr/akuiteo/rest/workforce/employees/search' \
--header 'Authorization: Basic dXNlcjpwYXNzd29yZA==' \
--header 'Content-Type: application/json' \
--header 'Cookie: JSESSIONID=759870920B6FFB1F4B62C4B6CA8E596B' \
--data-raw '{
    "code": {
        "operator" : "LIKE",
        "value": "J%"
    }
}'
````

*Response*
```json
[
    {
        "id": "500001430",
        "code": "JBE",
        [...]
    },
    {
        "id": "500001421",
        "code": "JBPN",
        [...]
    },
    {
        "id": "500002344",
        "code": "JSH",
        "name": "Smith",
        "firstName": "John",
        "action": null,
        "title": "M.",
        "phone": null,
        "mobilePhone": null,
        "email": "john.smith@akuiteo.com",
        "noTimesDunning": null,
        "multiCompany": false,
        "modeTimeRecording": 3.0,
        "modeInputSchedule": 0.0,
        "timeRecordingInputMode": "HOUR_MINUTE",
        "scheduleInputMode": "DAY",
        "executive": true,
        "generic": false,
        "candidate": false,
        "external": false,
        "managerMultiCompany": false,
        "employeeFunctions": {
            "allFunctions": false,
            "allSales": false,
            "allPurchases": false,
            "allOperational": false,
            "projectSalesManager": false,
            "projectFinanceManager": false,
            "projectProductionManager": false,
            "projectAccountManager": false,
            "projectAssignment": true,
            "projectPhaseManager": false,
            "projectSendOnMission": false,
            "salesSalesAssistant": false,
            "salesOrderAndEstimateTracking": false,
            "salesBillingSchedulesTracking": false,
            "purchasingBuyer": false,
            "timeRecording": true,
            "inputOfExpenseReport": true,
            "purchasesReceptionTracking": false,
            "inputSchedule": true,
            "cMMSContractSalesManager": false,
            "cMMSContractTechnicalManager": false,
            "cMMSMRAndEOManager": true
        },
        "employeeHistory": [],
        "timeRecordingRules": null,
        "scheduleRules": null,
        "businessCards": [],
        "number": "0000000077",
        "relations": [],
        "employeeAbilities": [],
        "jobType": null,
        "jobTypeId": "100257",
        "address": null,
        "addressId": "500020664",
        "customFields": null
    },
    {
        "id": "500001331",
        "code": "JTL",
        [...]
    }
]
⇒ We will focus on the employee John Smith for this tutorial, using its id 500002344
8.2. Retrieving detailed information about a specific employee
With the 1st API, we retrieved first-level information about the employee John Smith. However, we can see that some parameters are not detailed:
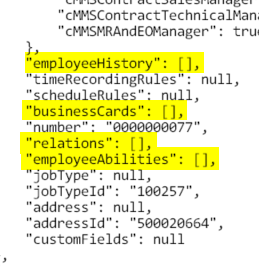
We want to know more about John Smith’s employee history and business cards. We will use the API: POST /employees/{employee_id}/read
Request (cURL)
curl --location --request POST 'https://akuiteo.my-server.fr/akuiteo/rest/workforce/employees/500002344/read' \
    --header 'Authorization: Basic dXNlcjpwYXNzd29yZA==' \
    --header 'Content-Type: application/json' \
    --header 'Cookie: JSESSIONID=23CA62EF43C941680939724925E737C0' \
    --data-raw '{
        "options" : ["EMPLOYEE_HISTORY", "BUSINESS_CARDS"]
    }'
Response
{
    "id": "500002344",
    "code": "JSH",
    "name": "Smith",
    "firstName": "John",
    [...]
    "employeeHistory": [
        {
            "id": null,
            "employeeHistoryType": "500000030",
            "employeeId": "500002344",
            "code": null,
            "from": "2020-10-01T00:00:00.000+0200",
            "to": null,
            "dailyHours": 7.42,
            "weekHours": 38.3,
            "occupancyRate": 0.0,
            "managerId": null,
            "companyId": "1",
            "directHourlyRate": 0.0,
            "standardHourlyRate": 0.0,
            "dailyCost": 0.0,
            "dailySellingPrice": 0.0,
            "entity": "500000040",
            "service": "500000058",
            "position": "Rédactrice Technique",
            "skill": "500000279",
            "employeeFamily1": "500000320",
            "employeeFamily2": "500000333",
            "employeeFamily3": "500000381",
            "leave": false,
            "modelWeek": null,
            "modelWeekId": "500000030",
            "salary": 1.0
        }
    ],
    "timeRecordingRules": null,
    "scheduleRules": null,
    "businessCards": [
        {
            "id": "500000040",
            "employeeId": "500002344",
            "cardNumber": "xxxxxxxxxxxx4444",
            "encryptedCardNumber": "XXXXXXXXXXXXXXXXXXXX",
            "name": "Business card",
            "type": "BUSINESS_ACCOUNT",
            "endDate": null
        }
    ],
    [...]
}
⇒ We can see that John Smith has one business card specified in his record sheet, with the id 500000040.
8.3. Modifying a field in the employee record sheet
We want to rename John Smith’s business card, from "Business card" to "John Smith’s business card". We will use the API: POST /employees/{employee_id}/business-cards/{business_card_id}
Request (cURL)
curl --location --request POST 'https://akuiteo.my-server.fr/akuiteo/rest/workforce/employees/500002344/business-cards/500000040' \
--header 'Authorization: Basic dXNlcjpwYXNzd29yZA==' \
--header 'Content-Type: application/json' \
--header 'Cookie: JSESSIONID=8773313A0C06782E338115058C24706A' \
--data-raw '{
    "id": "500000040",
    "employeeId": "500002344",
    "cardNumber": "xxxxxxxxxxxx4444",
    "name": "John Smith'\''s business card",
    "type": "BUSINESS_ACCOUNT",
    "endDate": null
}'
Response
500000040
````

If we make another call to the 2nd API, here is what we get:

*Response*

```json
{
    "id": "500002344",
    "code": "JSH",
    "name": "Smith",
    "firstName": "John",
    [...]
    "businessCards": [
        {
            "id": "500000040",
            "employeeId": "500002344",
            "cardNumber": "xxxxxxxxxxxx4444",
            "encryptedCardNumber": "XXXXXXXXXXXXXXXXXXXX",
            "name": "John Smith's business card",
            "type": "BUSINESS_ACCOUNT",
            "endDate": null
        }
    ],
    [...]
}
⇒ The business card’s name has been modified.
8.4. Creating a new business card and adding it to the employee record sheet
We now want to create a new business card and add it to John Smith’s record sheet. We will use the API: PUT /employees/{employee_id}/business-cards
Request (cURL)
curl --location --request PUT 'https://akuiteo.my-server.fr/akuiteo/rest/workforce/employees/500002344/business-cards' \
--header 'Authorization: Basic dXNlcjpwYXNzd29yZA==' \
--header 'Content-Type: application/json' \
--header 'Cookie: JSESSIONID=91BF7F6C3F9C83E3FBB959BD7AB0A7DB' \
--data-raw '{
  "employeeId" : "500002344",
  "cardNumber" : "1234123412341234",
  "name" : "Main business card",
  "type" : "BUSINESS_ACCOUNT"
}'
Response
500000045If we make another call to the 2nd API, here is what we get:
Response
{
    "id": "500002344",
    "code": "JSH",
    "name": "Smith",
    "firstName": "John",
    [...]
    "businessCards": [
        {
            "id": "500000040",
            "employeeId": "500002344",
            "cardNumber": "xxxxxxxxxxxx4444",
            "encryptedCardNumber": "XXXXXXXXXXXXXXXXXXXX",
            "name": "John Smith's business card",
            "type": "BUSINESS_ACCOUNT",
            "endDate": null
        },
        {
            "id": "500000045",
            "employeeId": "500002344",
            "cardNumber": "xxxxxxxxxxxx1234",
            "encryptedCardNumber": "XXXXXXXXXXXXXXXXXXXX",
            "name": "Main business card",
            "type": "BUSINESS_ACCOUNT",
            "endDate": null
        }
    ],
    [...]
}
⇒ The new business card with the id 500000045 has been added to John Smith’s record sheet.
8.5. Deleting the previous business card
We now want to remove "John Smith’s business card" (id 500000040) from the record sheet. We will the API: DELETE /employees/{employee_id}/business-cards/{business_card_id}
Request (cURL)
curl --location --request DELETE 'https://akuiteo.my-server.fr/akuiteo/rest/workforce/employees/500002344/business-cards/500000040' \
--header 'Authorization: Basic dXNlcjpwYXNzd29yZA==' \
--header 'Cookie: JSESSIONID=1E31A6F9012079EB3924361358932CEA'
If we make another call to the 2nd API, here is what we get:
Response
{
    "id": "500002344",
    "code": "JSH",
    "name": "Smith",
    "firstName": "John",
    [...]
    "businessCards": [
        {
            "id": "500000045",
            "employeeId": "500002344",
            "cardNumber": "xxxxxxxxxxxx1234",
            "encryptedCardNumber": "XXXXXXXXXXXXXXXXXXXX",
            "name": "Main business card",
            "type": "BUSINESS_ACCOUNT",
            "endDate": null
        }
    ],
    [...]
}
⇒ The business card "John Smith’s business card" has been deleted and John Smith now only has one business card.